 Robo Instructus devblog
Updates on the development of coding puzzler Robo Instructus
Iterative Progress And Open Source Contributions
I'm that guy who quit his job to sit in his house making games. Let's see how this goes! For my previous weekly posts look here.
I’m working toward the playable demo of the robot instruction game I showed a peek of last week. This week I’ll look at some of the under-the-hood design, open source contributions and, of course, actual visible progress.
Warning: 4 incoming sections of programmer gobbledygook. Skip to game progress.
Splitting compute & render
Part of the structure of my engine is a separation of compute & render logic. They run in different threads and communicate in a non-blocking way. This in itself is actually kinda novel in games where normally each frame you compute then render, each blocking the other. I want separate compute logic so I can have a deterministic & testable core to my games, and also because it’s nice to separate ‘separate’ things. An important part of splitting the two was having a simple way of communicating the latest compute state to the render loop without blocking either. This non-blocking single value channel mechanism is available at alexheretic/single-value-channel.
Spin sleeping
One way making the compute deterministic is to use a set delta, rather than a clock. But this means that I need to match up the simulation to the real clock pretty closely. I was having an issue with thread::sleep in that it isn’t, and isn’t designed to be, totally accurate. So I came up with a simple mechanism to improve the accuracy in a platform agnostic way, basically by trusting native sleep less and spinning the last section. And boom it really works to improve frame pause accuracy, with a small impact on CPU load. The lib is available at alexheretic/spin-sleep.
Iterative shader development
Since I’ve started talking about my libs… Not everything can be separated and TDDed. Things like shaders, programs that run on the GPU, you sometimes just need to see how it looks in the game, change it, look, change it, look, …, etc until it’s good. It takes me a while to get these bad boys right, and I like to tinker so I need to be able to do this fast. First I don’t want to restart the game each time I edit a shader file. I also really don’t want to re-compile my rust, because man rust is slow to compile. So I created a solution allowing the watching of my shader files and reloading them on the fly, lib at alexheretic/gfx-shader-watch.
Rust game development
The rust community is young but vibrant. This means it’s missing stuff and isn’t perfect, but people are enthusiastically working to make it better all the time. Gaming wise I’m currently relying on the open source libraries gfx-rs for rendering & winit & glutin for window & input handling. Recently I’ve contributed a little work to add support for Linux-XWayland to these libs, to compliment the X11 & ongoing Wayland support already there. This will allow me to support Linux better for the upcoming game. Hopefully I can get that working all the way up the stack in the coming weeks, letting me switch back to a wayland development environment.
Game progress: Exits & fail states
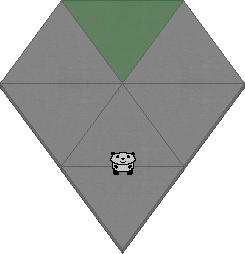
I have been working on the actual game too. In fact I’ve added something useful, the ability to succeed and fail. Nice idea huh? In the compute logic we now have the concept of exit tiles, they are where you’re trying to get your robot to. If you do that, you’ve succeeded. Also now the robot can properly fail by falling off the level, or just not making it to the exit. I haven’t been doing artwork this week, so simply colour the tiles in the shader to show what they are. So for now the exit tiles are just a bit green.

Game progress: Level design
With a bunch of the foundations now available I’ve been thinking about level design. I wanted to be able to rapidly create new layouts, so I created a simple ascii-art style format for my levels. So I can type this in a file:
# n: normal tile, x: exit, .: no tile
n  x  n
n  n  n
.  n
And then in the game, all ready to be roboted on, I see:

So this gives me a nice simple way to design and save levels. And now we can see our solutions succeeding or failing to complete levels. Note that for now all art is placeholder.
Btw the grey tiles you see in the video represent unknown tiles that could be anything.
Up next
I’m going to continue to cut corners in the art department, and focus on level and in-game API design (so Placeholder Panda is going to stick around for a while). For the demo I want a set of levels that teach the player the game, and provide a simple fun challenge that doesn’t feel like busy work.